Sue Garman’s Bed of Roses Applique Quilt
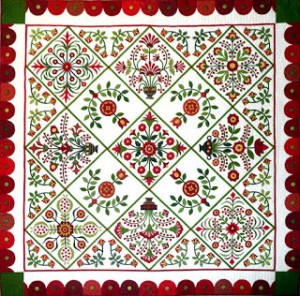
My first blog. This is just too exciting. I have so much to share. I just finished Sue Garman’s Bed of Roses Quilt. I ordered this as a Block of the Month (BOM) and started stitching in December. Everyone asks how long it takes to stitch an appliqué top. Well, I sort of timed myself, and it took just under (30) hours for each block or (2) “half blocks” for the side set-ins or the (4) triangle corners. I thoroughly enjoyed the process. Sue’s patterns just speak to me. This is what the quilt looked like from the pattern:
I am fortunate to have a fairly large design wall (8’ x 6’). As I completed each block, I put it up on the design wall. Just looking at the blocks daily, motivated me to continue. My monthly appliqué group that meets at my house offered eloquent words of support. I found that those stitches that were not perfect, the corner that would not come out as pointy as I would like, the curved leaf that ended up with a little bump . . .
really didn’t make a difference when incorporated into a queen size top. If I could pass on one piece of advice, it would be to “forgive yourself.” I had to learn to quit being so critical of my work, relax, and enjoy. What a difference it made in both my appliqué and level of enjoyment. I finished the top close to the end of March, but had not put the outer borders on (I call them the humpy, humpy borders). My husband put it up on the design wall, we both stepped back and admired it – then simultaneously said “It needs to be bigger.” Don’t judge me, but we USE our quilts . . . and the original size of this quilt was 80” x 80;” not quite big enough for a queen bed.
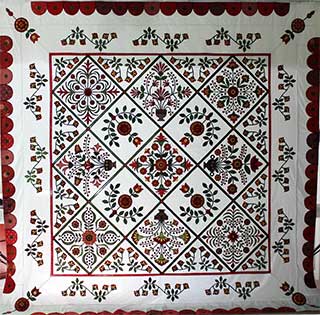
At first I was going to just add a plain green outside border increasing the size. But, as luck would have it, I had just purchased Karen Kay Buckley’s Border Design Workshop, DVD. If you haven’t seen this yet, you must treat yourself. I have to admit that I watched it over a couple of evenings – she has A LOT of great information to share. One of my “take-aways” was put immediately to use on this quilt. Karen sells thin, almost butcher paper that is 9”wide, to be used to design borders. I ordered this and cut it to length (including a miter border). Her suggestion was to take elements from the interior of the quilt and repeat them in the border. This would then tie the quilt together. My husband – the creative one – was called to service. I had saved all of my templates, as well as any leftover fabric from the BOM kits. He was tasked with creating a border using existing templates. I thought maybe some type of vine with leaves and flowers would be appropriate. My only request was that he not use the reverse appliqué flower used in the setting and corner triangles (sorry Sue) as these took a bit of time to make. I left for work, and when I returned that evening, he had designed the new border. I decided to add the new border before the humpy, humpy border. The next day he drew and colored it in photoshop as well as used the “butcher” paper and templates to adjust the spacing (Karen has a wonderful way of figuring out the spacing – you really have to watch this DVD!) It was BEAUTIFUL! I immediately fell in love, again with this quilt. The only downfall, was that he had used the flower I had asked him not to use (do men EVER listen). When you get a chance, count them . . . 72!!! 72 flowers that were not my favorite. He said he thought I had said TO use this flower. Oh well. I spent every spare minute making the flowers off-block; then started on the border. After the flowers were complete, the borders went very quickly. I added the new borders to the quilt top, added one hump to the premade humpy, humpy outside borders, and added them with their green corner squares.
Boy, I hope I don’t make Sue mad – but I didn’t like the green outside corner squares. I un-sewed them, and added just plain background. When we reviewed our handiwork, both my husband and I felt that the “white” outside corner squares coupled with the “airy” new interior border, needed something. Again, Rick to the rescue. He suggested using the large tulip used in the four blocks surrounding the center square. This seemed to be just enough additional appliqué to anchor the corners without feeling too heavy. I LOVE THE RESULTS! What do you think?
I’m also working on Sue’s Sarah’s Revival and Lily Rosenberry in red and green. I actually started Lily a year or so ago. I made a couple of “test” blocks, then set out to make the 1200 berries (I might be exaggerating just a bit). The berries are all made using Karen Kay Buckley’s Perfect Circles, and it is time to finish up the blocks. I loved this quilt when I saw the picture, then say a picture of Sue’s in brown and pink. OMG!
Can I possibly make both?
Barbara


Hello Barbra,
Your quilt us just stunning! Congratulations! Isn’t it wonderful to complete a quilt? I too am working on sue garmens Lily Rosenberry and I am ashamed to say that I started it about three years ago, although I have made the majority of the circles and I believe there is 1034 (how crazy is that)
I also wanted to congratulate you on your appliqué academy and will hopefully be attending in March.
Very best wishes in your new endeavour.
Wendy westlake
Dear Barbara
I love your addition to Sue’s pattern. I think it really compliments so much more, your husband had the right idea (even if he was misguided). It just makes the quilt “pop”!!!!! I keep going back and forth between the two, comparing, and it most definitely makes a more pleasing look with your design enhancement. Thank you for sharing your quilt as well as your words
of “forgive yourself”. Sometimes, we get so carried away with being so precise and NOT enjoy the trip.
Again thank you for this as well as continuing the academy in this form……..
Peggy
Beautiful! It’s always interesting to know the thought process behind a person’ design choices.
I love the changes you’ve made to make this your own. Each quilt looks so beautiful when done.When you think that a weeks labor goes into each block I am amazed at how long it takes to complete! That’s close to 6 months of actual hands on work! So looking forward to your continued blog. Thanks for your input.
beautiful quilt Barbara…can’t wait to see it in person. Would love to see your progress on the Lily Rosenberry quilt as well.
Barbara,
Love your finished Bed of Roses quilt with the new corners. You and Rick make a great team. Looking forward to seeing Lily Rosenberry when you get THEM finished.
Beautiful Beautiful Beautiful Looking forward to March!!!!!! Keep up the great work!!!!!!
Like you Barbara (and your husband) your quilt is beautiful!
Barbara, your quilt is beautiful. I love the red and green. Thank you for your advice and allowing imperfections. I am working on a project now and had the same problem of “imperfections”. At first I was worried but then decided that even in nature everything is not perfect so it was ok to let it go. I was so excited to hear of the academy. Maybe I can even make it sometime. Congratulations! And your husband is a keeper! 🙂